
Manage the users
The Users page shows the users of the workspace and their roles. You need the permission View users to open the page.
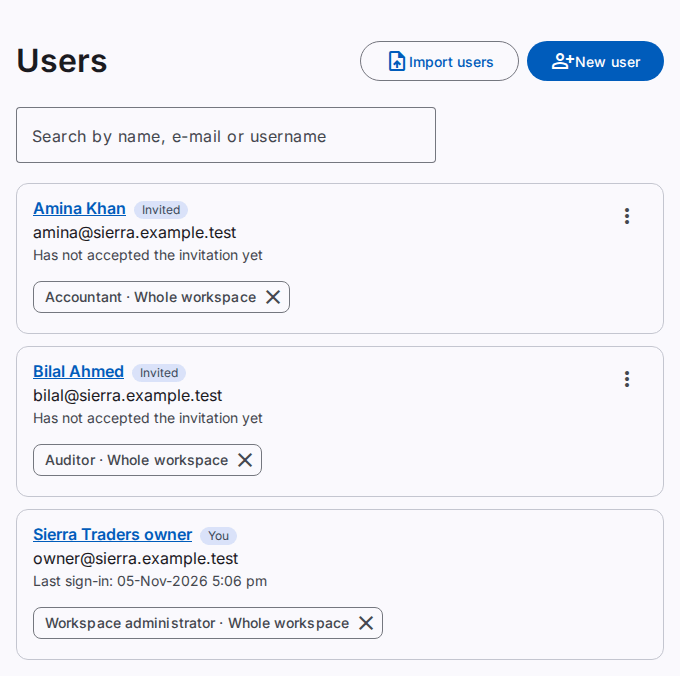
What the page shows
- The page shows only the users that you can see. Users outside your companies or branches are not shown.
- Each user has a card with the name, the e-mail address or the username, and the last sign-in.
- Each role shows as "role · place". The place is the whole workspace, a company or a branch.
- A label shows You on your own card.
- A label shows No e-mail for a user who signs in with a username.
- A label shows Invited or Deactivated when the user is not active.
Find a user
- Type a part of the name, the e-mail address or the username in Search by name, e-mail or username.
The list shows only the users that agree with the text.
What you can do on this page
The buttons and the menu items show only when you have the permission for them. The server also checks each action.
- Select New user to add a user. See Add a user.
- Select Import users to add many users from a file. See Import users from a file.
- Select the name of a user to open the user detail page. See The user detail page.
- Select the menu button (three dots) on the card of a user to see the actions for this user.
The menu can have these items:
- Give a role. See Give a role to a user.
- Edit: change the name. For a user without e-mail, you can also change the username and the language.
- Reset password: set a temporary password for a user without e-mail.
- Send the invitation again and Cancel the invitation: for a user with the status Invited.
- Deactivate or Reactivate. See Deactivate or reactivate a user.
You cannot use these actions on your own account.